Making a piping bag nozzle at home is easy. You can use simple materials. This helps you decorate cakes and cupcakes. You can save money. You do not need to buy expensive tools. This guide will show you how to create your own nozzle.
What is a Piping Bag Nozzle?
A piping bag nozzle is a tool. It helps you control icing. You can make different shapes and designs. There are many types of nozzles. Each one has a different purpose. Some make stars, while others make flowers. Nozzles can be small or big. You can choose based on your needs.
Why Make Your Own Nozzle?
Making your own nozzle is fun. It is also cost-effective. You can use things you already have. You can create unique designs. This is a great way to get creative. You can make a nozzle that fits your style. Plus, it is easy to clean. You can reuse it many times.
Materials You Will Need
Gather these materials:
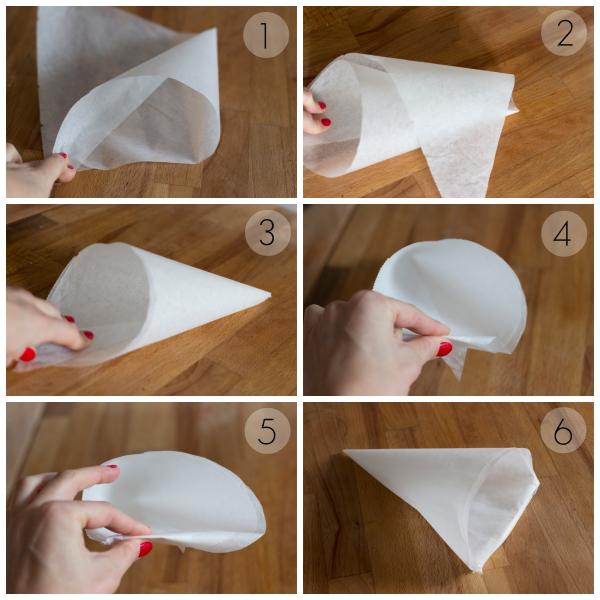
- Plastic bottle or paper cone
- Scissors
- Tape or glue
- Wax paper or parchment paper

Credit: www.youtube.com
Steps to Make a Piping Bag Nozzle
Follow these simple steps:
Step 1: Choose Your Base
You can use a plastic bottle. Or you can use a paper cone. A plastic bottle is strong. A paper cone is easy to make.
Step 2: Cut The Tip
If you use a bottle, cut the tip. The cut should be small. You can make it bigger if needed. If you use a paper cone, cut the tip too. Make sure it is at an angle. This helps in icing.
Step 3: Test The Size
Before using it, test the size. Fill it with icing. Squeeze gently. Check if it is coming out right. If not, cut a little more.
Step 4: Secure The Opening
Use tape or glue to secure it. This keeps the icing from leaking. You want a tight fit. A loose fit will make a mess.
Step 5: Create Different Shapes
You can create different nozzles. For stars, cut a star shape. For flowers, cut petal shapes. Get creative with your designs.
Using Your Piping Bag Nozzle
Once your nozzle is ready, fill it. Use icing or whipped cream. Twist the top to close it. Hold it firmly. Squeeze gently to make shapes. Practice on wax paper first. This helps you get better.
Tips for Better Results
- Use thick icing for better shapes.
- Keep the bag at a 45-degree angle.
- Practice different designs on paper.
- Use a steady hand when piping.
Cleaning Your Nozzle
After using your nozzle, clean it well. Rinse it with warm water. If you used a plastic bottle, wash it with soap. Make sure there is no icing left. This will help you reuse it.
Other Creative Uses
Your piping bag nozzle can do more. Use it for decorating cookies. You can also fill pastries. It works for making chocolate shapes. The possibilities are endless. Get creative with your designs.
Credit: food.onehowto.com
Conclusion
Making a piping bag nozzle at home is simple. You can use common materials. This helps you save money. It also lets you be creative. Try making different shapes and sizes. Your baking will become more fun. Enjoy decorating your cakes and cookies!